Using bind mounts
that are managed by host system
Using bind mounts is the oldest and the most troublesome way of persisting container data outside the container.
Table of contents
The advantage of using bind mounts is, that their content can be easily accessed from the host computer, if the user has sufficient permissions. This makes modifications and backups simpler comparing to volumes.
They also support binding of single files, not only the whole folders.
The disadvantage of bind mounts is, that they are managed by the host system and therefore they are very sensitive to the differences between environments. Handling file permissions and ownership can be sometimes a real nightmare.
From Docker Docs
Bind mounts may be stored anywhere on the host system. They may even be important system files or directories. Non-Docker processes on the Docker host or a Docker container can modify them at any time.
Because the Docker CLI functionality is evolving, it’s recommended to follow the section Bind mounts in the official Docker documentation.
Before persisting data outside the container you should read the section Manage data in Docker in the official Docker documentation.
Table of contents
- TOC
Exercise 1
Let’s say that you want to persist the container’s folder
/home/headless/Documentsin the folder$HOME/my-documentson the host computer. You want to name the containerdevrun.
You can do it by creating the container using the following command:
docker run -d --name devrun -p "35901:5901" -p "36901:6901" -v "$HOME/my-documents:/home/headless/Documents" accetto/ubuntu-vnc-xfce-g3
You can connect to the container as it’s described in the section Headless working and store some files into the folder /home/headless/Documents.
Then you can remove the container using the command:
docker container rm -f devrun
You can verify that the folder $HOME/my-documents on your host computer has not been removed with the container.
If you now re-create the container, it will use the same folder on your host computer and all the data will be still there, until the data or the folder are deleted.
If you are on Linux with
Docker Desktopinstalled, you will notice that the ownership of the folder$HOME/my-documentshas changed. You may not be able to remove the folder without using elevated permissions (sudo). It’s the case even if you’ve created the folder yourself before creating the container. The reason is explained in the chapter about the Docker Desktop for Linux pitfall.
Pitfall HOME binding
HOME binding
Avoid binding the whole$HOMEdirectory in the container to an external folder. It will not work correctly in most cases on most environments, because the$HOMEdirectory will not be completely and correctly initialized. It can seemingly work on some environments and you can even get it working on some other, if you have enough knowledge, but this scenario is currently not recommended and not supported. One sign of incomplete initialization of the$HOMEdirectory is the missingVersion Stickerlauncher on the desktop.
Let’s create a detached container named pitfall-bind and bind the whole home directory /home/headless to the folder $HOME/pitfall-home-binding-using-bind on the host computer.
Create the container using the following command:
docker run --name pitfall-bind --hostname pitfall-bind -d -p "35901:5901" -p "36901:6901" -v "$HOME/pitfall-home-binding-using-bind:/home/headless" accetto/ubuntu-vnc-xfce-g3
You will end up with the seemingly correct container shown on the following screenshot:
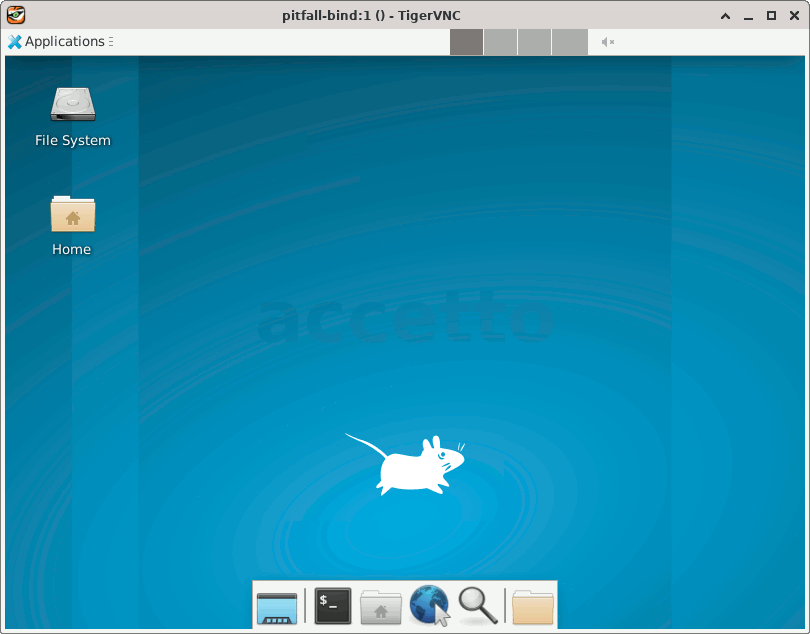
You can see, that some launchers on the desktop are missing, including the Version Sticker launcher. You will also find out, that not all usual subdirectories of the $HOME folder have been created. You’ll also get some troubles with the permissions.
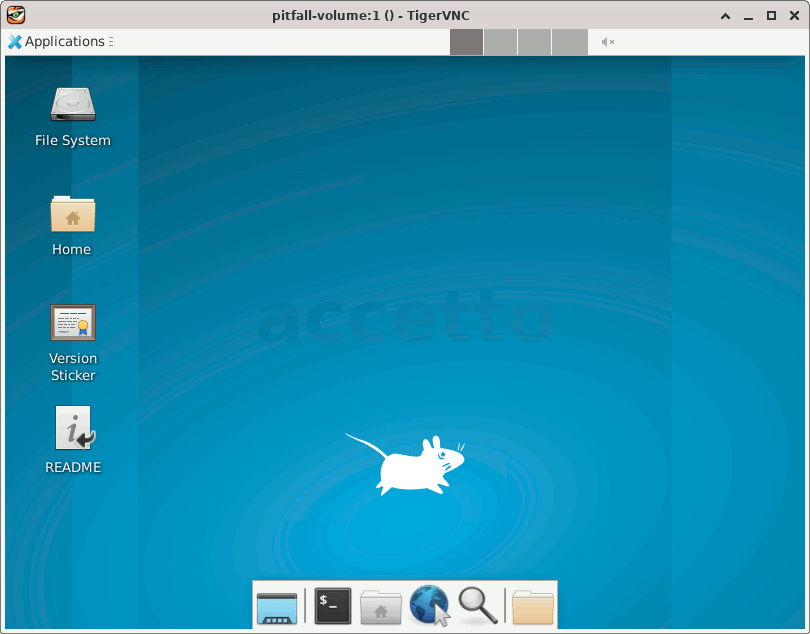
The correctly initialized container would look like this:
You can remove the exercise container using the following command:
docker rm -f pitfall-bind
Note that the folder on your host computer is not removed with the container. You can create another container and re-use the same folder. All the previous container data will be still there.
You can remove the exercise folder using the following command:
rm -rf $HOME/pitfall-home-binding-using-bind/
If you are on Linux with
Docker Desktop for Linuxinstalled, then you may not be able to remove the folder$HOME/pitfall-home-binding-using-bindon your host computer without using elevated permissions (sudo). It’s the case even if you’ve created the folder yourself before creating the container. The reason is explained in the chapter about the Docker Desktop for Linux pitfall.
Avoiding pitfall HOME binding
One way around the
HOME bindingpitfall is to create and initialize the container first, then copy out the whole$HOMEdirectory (see Data inside) and only then to bind it to the container.
Even simpler is to bind the whole $HOME directory to a volume.
Let’s create a detached container named
pitfall-volumeand bind the whole home directory/home/headlessto a named volumepitfall-home-binding-volume.
docker run --name pitfall-volume --hostname pitfall-volume -d -p "35901:5901" -p "36901:6901" -v "pitfall-home-binding-volume:/home/headless" accetto/ubuntu-vnc-xfce-g3
This time is the container initialized correctly:
You can remove the exercise container using the following command:
docker rm -f pitfall-volume
Note that the volume is not removed with the container.
You can verify it using the following command:
docker volume ls
DRIVER    VOLUME NAME
local     pitfall-home-binding-volume
You can create another container and re-use the same volume. All the previous container data will be still there.
You can remove the exercise volume using the following command:
docker volume rm pitfall-home-binding-volume
Pitfall Docker Desktop for Linux changing ownership
Docker Desktop for Linux changing ownership
If you are on Linux withDocker Desktop for Linuxinstalled, then you’ll notice, that Docker Desktop keeps changing the ownership of the folders on your host system, that are used for bind mounts.
This behavior is specific to Docker Desktop for Linux and it is caused by using virtiofs for sharing files between the host and the containers.
As the result, Docker desktop for Linux maps the current user ID and GID to 0 in the containers. For this to work, the system files /etc/subuid and /etc/subgid must exist on the host computer.
The ownership of the folders used for the bind mounts is usually set to 100999:100999, because the UID/GID range defined by the system files mentioned above is typically 100000:65536.
There is currently no way to change this behavior. You can read more about it in the official Docker documentation here and here.
This discrepancy in behavior between different Docker Desktop releases is unfortunate, but there are still enough reasons for using also Docker Desktop for Linux.
The description below shows two ways how to mitigate the inconvenience.
Exercise 2
Let’s create a detached container named
pitfall-desktopand bind its folder/home/headless/Documentsto the folder$HOME/pitfall-docker-desktopon your host computer.Let’s create the folder on the host before creating the container. It will allows you to check the folder ownership before the binding takes place.
Let’s also ensure that the current directory is your home directory on the host.
Create the folder for binding using the following command:
mkdir pitfall-docker-desktop
Now check the folder ownership using the following command:
getfacl -n pitfall-docker-desktop/
# file: pitfall-docker-desktop/
# owner: 1000
# group: 1000
user::rwx
group::r-x
other::r-x
Create the exercise container using the following command:
docker run --name pitfall-desktop --hostname pitfall-desktop -d -p "35901:5901" -p "36901:6901" -v "$HOME/pitfall-docker-desktop:/home/headless/Documents" accetto/ubuntu-vnc-xfce-g3
Now you can already see that the folder ownership has indeed changed:
getfacl -n pitfall-docker-desktop/
# file: pitfall-docker-desktop/
# owner: 100999
# group: 100999
user::rwx
group::r-x
other::r-x
The exercise container can be removed using the following command:
docker rm -f pitfall-desktop
The exercise folder can be removed using the following command:
rm -rf pitfall-docker-desktop
You may need elevated
sudopermissions for removing the folder.
Mitigating pitfall Docker Desktop for Linux changing ownership
This pitfall is actually not so bad as it seems, if you’re able and willing to make a few adjustments on your host computer.
If you don’t want or can’t to do that, then a few simple aliases can also help with the problem.
Let’s say you want to use the GIMP container for processing the screenshots you’re taking on the host computer. You want to store the screenshots into the folder
$HOME/pitfall-docker-desktopon the host computer. The folder will be bound to the container’s folder/home/headless/Documents. You’re on Linux and you haveDocker Desktop for Linuxinstalled. The current directory is your home directory on the host.
In this scenario you’ll probably become annoyed by the changing ownership of the bound folder pretty soon, because you need to access the folder from the host and also from the container each time you take and then process a screenshot.
Create the folder for binding using the following command:
mkdir pitfall-docker-desktop
Create the exercise container with GIMP using the following command:
docker run --name pitfall-desktop --hostname pitfall-desktop -d -p "35901:5901" -p "36901:6901" -v "$HOME/pitfall-docker-desktop:/home/headless/Documents" accetto/ubuntu-vnc-xfce-gimp-g3
After the image is downloaded and the container created, you can check the changed ownership of the bound folder:
getfacl -n pitfall-docker-desktop/
# file: pitfall-docker-desktop/
# owner: 100999
# group: 100999
user::rwx
group::r-x
other::r-x
Let’s look at two ways how to mitigate the inconvenience caused by the changed ownership of the shared folder.
Mitigation 1 (group)
The best approach is to create an appropriate user group on the host computer, put the user running the Docker Desktop application into it and then to adjust the permissions of the shared folder.
Let’s begin with creating a new user group on the host computer:
sudo groupadd -g 100999 dockerdesktop
The GID must be
100999, the same value as Docker Desktop is using.The user group name is
dockerdesktop, but it can be any name that doesn’t exist on the host computer yet.
Assuming that the Docker Desktop application runs under you account, put yourself into the new user group:
sudo usermod -aG dockerdesktop $(whoami)
You’ll need to logout and then login again to apply the group membership changes. However, let’s finish the second part of the adjustments first.
You have to ensure, that the bound folder and its content belong to the new group:
sudo chgrp -R dockerdesktop pitfall-docker-desktop/
You also have to ensure that the new group is able to change the shared content:
sudo chmod -R g+w pitfall-docker-desktop/
Check the adjustments:
getfacl -n pitfall-docker-desktop/
# file: pitfall-docker-desktop/
# owner: 100999
# group: 100999
user::rwx
group::rwx
other::r-x
You can remove the exercise container before you logout:
docker rm -f pitfall-desktop
After you login again, the changes in your group membership has been already applied and you should be able to remove the exercise folder without needing elevated permissions:
rm -rf pitfall-docker-desktop
Mitigation 2 (aliases)
If you don’t want or can’t make changes on your host computer, you can create simple aliases for taking back the ownership of the shared folders.
Create one set of aliases on the host and one in the container.
If the folder path is the same on the host and in the container, you can use the same code in both environments. Otherwise adjust the target path appropriately.
For example:
alias allmine='sudo chown -R "$(id -u):$(id -g)" $HOME/Pictures/Screenshots/'
Each time you have problems with the ownership of the bound folder, you execute the alias
allminein the current environment and it will set the current user account as the owner of the whole folder content.
Put the commands creating the aliases into the file
$HOME/.bashrc. The aliases will be then available in all terminal sessions.